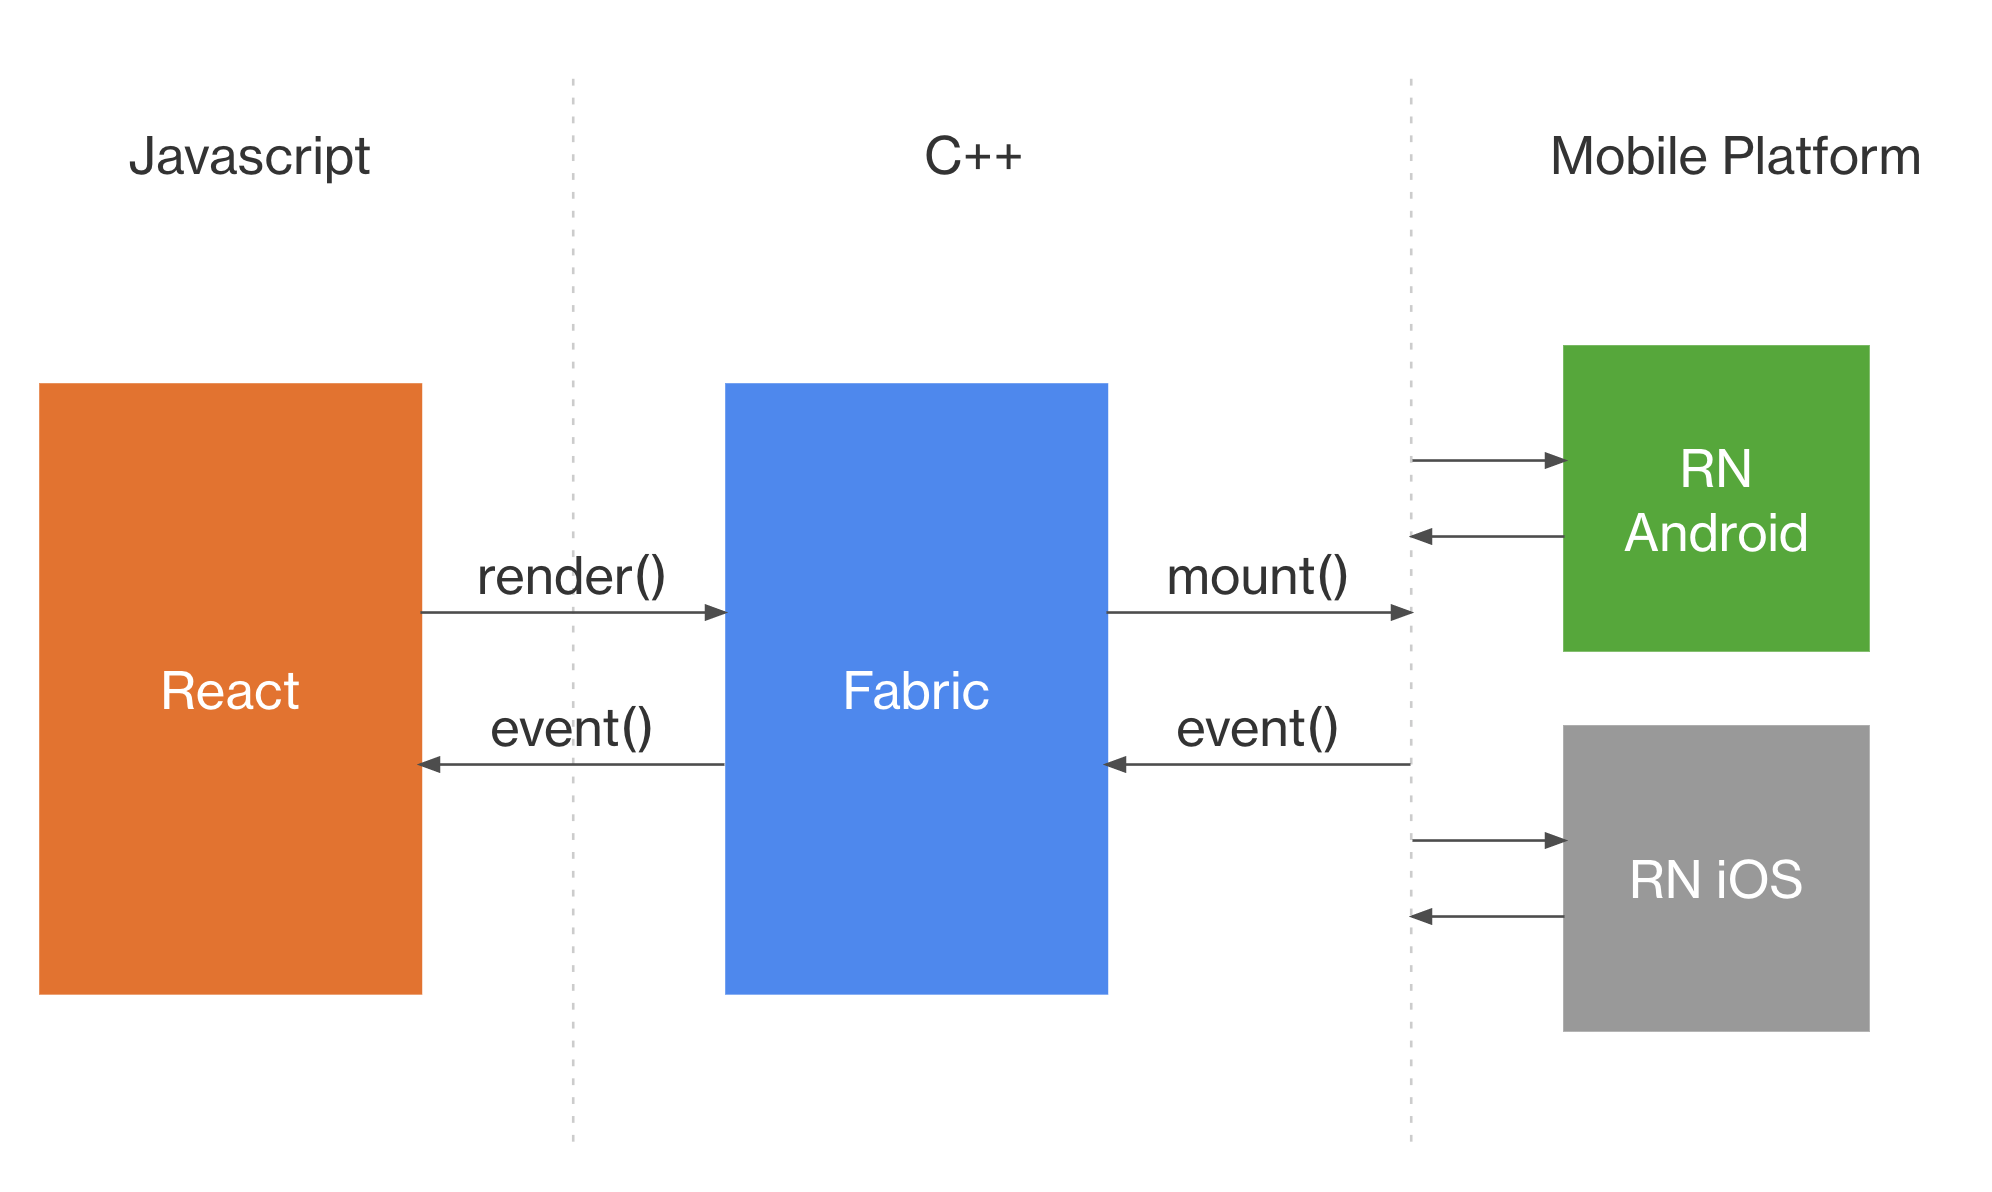
Using Swift in Fabric components and Turbo Modules

React Native’s new architecture is here, a few more releases, and it will be enabled by default for new library projects.
A lot of important libraries have already started to migrate or completed the migration to this new architecture.
Scroll to the end and clone the example project where Swift is being used in Fabric components and Turbo Modules, or stay with us and learn how to do this step-by-step.
While Turbo Modules fully supports Swift, the create-react-native-library doesn’t offer a template for this. Here’s how you can use it:
- Make sure to add
@objc publicto classes and methods you want to expose in Objective-C/C++. - Import the Swift headers:
#import (your podspec name)-Swift.h, in your Objective-C++ file (.mm).
When trying to build a Fabric component in Swift I saw this discussion where I saw that Swift is not supported yet.
At first, I was surprised by this, then I quickly I realised that although Objective-C is easily interoperable with Swift, in this new arhitecture there is a layer that is completely OS-agnostic and written in C++. That layer is called Fabric, basically the RN team created a fully cross-platform implementation for the React Shadow Tree.
This wasn’t enough for me, so I start digging more. I was thinking that perhaps there are some C++ parts that might not be compatbile with Swift because C++ interoperability is supported only in Swift 5.9 and above.
There is a way
To be able to call Swift code, you need to have a thin Objective-C layer. Let’s create a new RN library and show you step-by-step.
cristiangutu@ % npx create-react-native-library@latest new-lib
✔ What is the name of the npm package? … react-native-new-lib
[...]
✔ What type of library do you want to develop? › Turbo module with backward compat
✔ Which languages do you want to use? › Kotlin & Objective-C
✔ Project created successfully at new-lib!
Make sure you select Turbo module with backward compat, we will start with a simple Turbo module for now.
Install node_modues, the iOS Pod dependencies and start the Metro server.
cd new-lib
yarn
cd example/ios/
bundle install
RCT_NEW_ARCH_ENABLED=1 pod install
cd ..
yarn start
Open Xcode, NewLibExample.xcworkspace, and try to run the example project. It’s important to have a fully working iOS project in this state.
Swift Turbo Modules
To support Swift in a Turbo Module, we need to tell CocoaPods to pick up the .swift extension. Open the react-native-new-lib.podspec and include swift in source_files list.
[...]
    s.platforms    = { :ios => min_ios_version_supported }
    s.source       = { :git => "https://github.com/cristiangu/react-native-new-lib.git", :tag => "#{s.version}" }

    s.source_files = "ios/**/*.{h,m,mm,swift}" 👈

    # Use install_modules_dependencies helper to install the dependencies if React Native version >=0.71.0.
    # See https://github.com/facebook/react-native/blob/febf6b7f33fdb4904669f99d795eba4c0f95d7bf/scripts/cocoapods/new_architecture.rb#L79.
    if respond_to?(:install_modules_dependencies, true)
[...]
Now let’s have a simple Swift class. Inside new-lib/ios, create a new file with the following implementation:
// Calculator.swift

@objc public class Calculator: NSObject {
    @objc public static func multiply(a: Double, b: Double) -> Double {
        return a * b
    }
}
Go to new-lib/example/ios and run RCT_NEW_ARCH_ENABLED=1 pod install, you should see the Pod being installed again.
[...]
[Codegen] Found rncore
Downloading dependencies
Installing react-native-new-lib 0.1.0 👈
Generating Pods project
[...]
Let’s use it, we need to import a special header. This .h file behaves like an umbrella header for your Swift code. To learn more about this, check out these docs. Open new-lib/ios/NewLib.mm and make the following changes:
#import "NewLib.h"
#import "react_native_new_lib-Swift.h" // 👈 Yes, Xcode will not allow `-` characters, only for the last part.
@implementation NewLib
RCT_EXPORT_MODULE()
// Example method
// See // https://reactnative.dev/docs/native-modules-ios
RCT_EXPORT_METHOD(multiply:(double)a
b:(double)b
resolve:(RCTPromiseResolveBlock)resolve
reject:(RCTPromiseRejectBlock)reject)
{
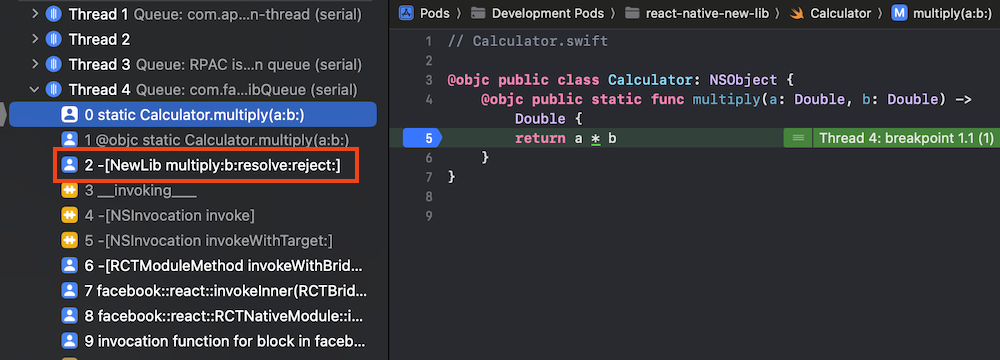
double result = [Calculator multiplyWithA:a b:b]; // 👈
resolve([NSNumber numberWithDouble:result]); // 👈
}
[...]
Add a breakpoint in Xcode, run again the Example project and you will see the Swift code being executed. 🎉
Supporting both Fabric components and Turbo modules
All the templates offered by the create-react-native-library don’t include a template to have a Fabric components and Turbo modules in the same library.
To achieve this, open new-lib/package.json and scroll to the bottom and do the following change:
[...]
 "codegenConfig": {
    "name": "RNNewLibSpec",
    "type": "all", 👈
    "jsSrcsDir": "src"
  }
Using Swift in Fabric components
In our current project we will start to create some files for our new MyComponentView Fabric component. Basically I will re-use most of the files that are generated when you create a new library, make sure you choose the Fabric view with backward compat template.
cristiangutu@ % npx create-react-native-library@latest my-component
✔ What is the name of the npm package? … react-native-my-component
[...]
✔ What type of library do you want to develop? › Fabric view with backward compat
✔ Which languages do you want to use? › Kotlin & Objective-C
✔ Project created successfully at my-component!
Copy the following files from my-component/ios into new-lib/ios:
- MyComponentView.h
- MyComponentView.mm
- MyComponentViewManager.mm
Open the MyComponentView.mm file and replace all the RNMyComponentViewSpec strings with RNNewLibSpec. This value is generated from new-lib/package.json, codeGenConfig property.
Replace the #import "Utils.h" lines from MyComponentView.mm and MyComponentViewManager.mm with:
#import "react_native_new_lib-Swift.h"
Now let’s create something that can be used in our Fabric component, let’s have the usual Hex to UIColor converter. Inside new-lib/ios create this new file:
// UIColor+Hex.swift

extension UIColor {
    @objc public convenience init(hex: String, alpha: CGFloat = 1.0) {
        var hexValue = hex.trimmingCharacters(in: CharacterSet.whitespacesAndNewlines).uppercased()

        if hexValue.hasPrefix("#") {
            hexValue.remove(at: hexValue.startIndex)
        }

        var rgbValue: UInt64 = 0
        Scanner(string: hexValue).scanHexInt64(&rgbValue)

        let red = CGFloat((rgbValue & 0xFF0000) >> 16) / 255.0
        let green = CGFloat((rgbValue & 0x00FF00) >> 8) / 255.0
        let blue = CGFloat(rgbValue & 0x0000FF) / 255.0

        self.init(red: red, green: green, blue: blue, alpha: alpha)
    }
}
Both MyComponentView.mm and MyComponentViewManager.mm are setting a background color using the value sent in the color prop on the JS side. We need to update those implementations to use our new Swift implementation.
Find and replace all the [_view setBackgroundColor: occurrences with:
[_view setBackgroundColor: [[UIColor alloc] initWithHex:colorToConvert alpha:1.0]];in MyComponentView.mm[view setBackgroundColor: [[UIColor alloc] initWithHex:json alpha:1.0]];in MyComponentViewManager.mm
The iOS native implementation is complete now, let’s go back to JS realm 🌈 and link them together. Inside new-lib/src create new file, and add the following implementation:
// MyComponentViewNativeComponent.ts

import codegenNativeComponent from 'react-native/Libraries/Utilities/codegenNativeComponent';
import type { ViewProps } from 'react-native';

interface NativeProps extends ViewProps {
  color?: string;
}

export default codegenNativeComponent<NativeProps>('MyComponentView');
In the new-lib/src/index.tsx file, add the following exports:
[...]
export { default as MyComponentView } from './MyComponentViewNativeComponent';
export * from './MyComponentViewNativeComponent';
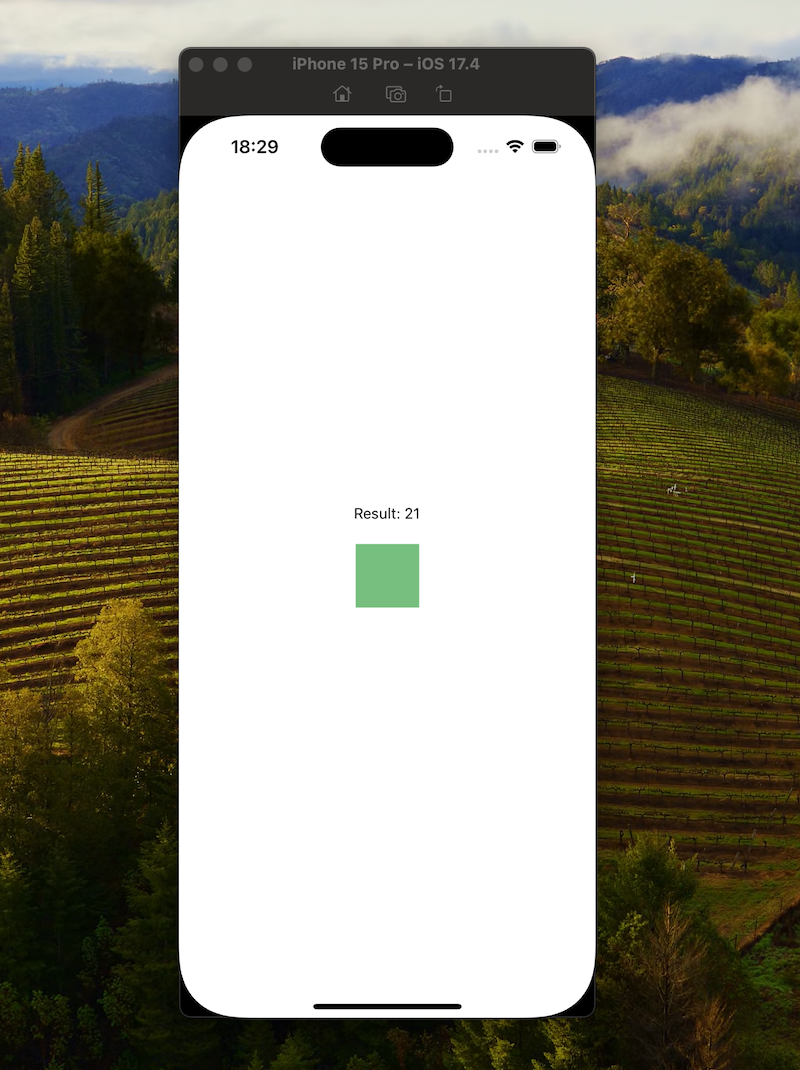
Edit the new-lib/example/src/App.tsx to use your new Fabric component:
[...]
return (
    <View style={styles.container}>
      <Text>Result: {result}</Text>
      <MyComponentView style={styles.box} color="#64C17F" /> 👈
    </View>
  );
[...]
Refresh everything by running RCT_NEW_ARCH_ENABLED=1 pod install inside new-lib/example/ios and run again the Example app.
You should see our new Fabric component in the wild! 🎉
Conclusion
This is very simple example of using Swift inside Turbo modules and Fabric components, but I will stop here because this article is already too long.
Having this in place enables you to start using fully-fledged UIViews defined in Swift; in the - (instancetype)initWithFrame:(CGRect)frame method from MyComponentView.mm you are free to instantiate any UIView defined in Swift.
It’s time to use the best of both worlds, React Native’s New Architecture and Swift on iOS!
Check out this example project with everything that we did today.
Feel free to write your question in the comments section bellow and let’s connect on LinkedIn.
Explore more like this

react-native-get-random-values for the New Architecture
When working with cryptographic operations in JavaScript, especially in libraries like @aws-amplify/react-native, access to a secure random number generator is essential. In browsers, the crypto.getRandomValues() method is typically used for...

Cut React Native Build Times by 75% with Artifact Caching
Reducing your build times is achievable by recycling your native build artifacts. In this guide, I will walk you through the steps required to implement this process effectively.

Comments